Perhaps its just me but with all the negative information finally making its way out of the government condoned cloud of censorship ….. (regarding how legal citizens have been betrayed for years by politically corrupted individuals operating within government positions, departments, agencies, bureaus, districts, etc. who utilize the power and authority of those government entities to wrongfully dismiss, silence, victimize etc all who voice opposition to the radical left agenda for America) …… even small DIY (Do It Yourself) accomplishments can help take the sting out of an administration gone mad – even if only momentarily distracting from the evil currently misdirecting and consuming OUR COUNTRY and HER CITIZENS. Yup, I do indeed pay attention to what is happening under this CROOKED ADMINISTRATION, compliments of a STOLEN ELECTION, but it can get really depressing and frustrating…..thus the old expression: IGNORANCE IS BLISS. Who worries when they don’t even know what there is to worry about?
[Psst… if you are not watching OAN you’re not getting the full story. And if you watch CNN and the like you’re only getting the radical left disinformation, but enough about that depressing stuff – this post is about a carburetor project and although certainly not “bliss”, digging into that carburetor problem was not only educational and wonderfully distracting – but hopefully rewarding as well if I can get that ATV running again.]MIKUNI E961 CARBURETOR PROJECT
Unfortunately I failed to get a good photo of the original jet in its recessed carburetor tube housing but can assure you the soft brass screw head was “booger’d up” (slang term for “damaged beyond use”) pretty bad with no recognizable slot for THE CORRECT SIZED flat blade screwdriver. [Oh yeah, a carburetor “jet” is most often just a small threaded brass component with a specific sized hole that permits either fuel or air to enter the carburetor for mixing and eventual combustion in the engine. Just a tiny speck of material that gets into the carburetor can clog a jet making the engine run in an undesirable way if it runs at all. The reason inline fuel filters are so important. The yellow object at “5 o’clock” in the below photo is the fuel filter.]
BELOW: There she is (carburetor) – center of image with the ATV seat removed and looking down.

When I received the ATV it hadn’t been run for a year or so and everything in the carburetor was varnished and clogged due to fuel remaining in the system for so long. (Fuel had apparently leaked and/or eventually evaporated away.) I recall cleaning the carburetor and preparing to replace the jets but after cleaning them up realized they appeared to be OK – that is all but the pilot jet which had a damaged brass head making removal at the time likely impossible without some risky work I had never performed.
Since the primary objective at the time was to just get the engine running again, I decided to leave that one jet alone for the time being and focus on other necessities in getting the engine started with ultimate success.
FAST FORWARD YEARS LATER…..the carburetor was beginning to act up a bit on the last high desert adventure but I was able to keep it working satisfactorily but when I returned home to Don Pedro and started hauling broken tree branches from a recent storm, well, on the first trip the vehicle made it downhill but could not make it back up. Ultimately I could not even start the engine. (Strange….. could that month at a 3,800′ higher elevation have affected the problem somehow? Why did it work until getting back to the home elevation to protest and quit? Perhaps the elevation difference really doesn’t matter at all, and was just a coincidence?) Whatever! Engine wouldn’t start and everything pointed to the carburetor.
“No problem (My aging senior brain offered in optimistic response) just clean the carburetor and replace anything that appears broken or too worn.”
TEMP FIX OUTLASTED MEMORY OF THE EVENT
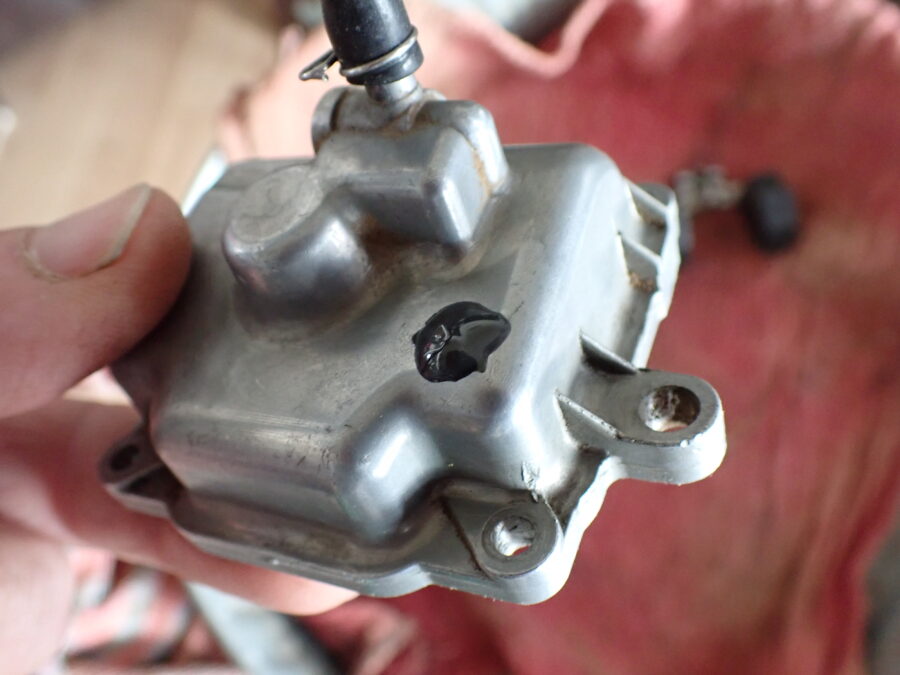
Funny how those “temporary fixes” often become permanent until the “temporary'” aspect fails long after the memory of its “temporary installation”. [Actually performed another “temporary fix” last night with some J-B Weld on a pinhole in the carb float bowl. Saw a small spot of rust from both inside and outside the bowl in the same location during cleaning and suspected a micro hole due to stains on the surrounding metal. My first thought was J-B WELD and after some research on this particular application decided on this fix verses drilling it out and tapping with a small screw. So I aggressively cleaned the rust out then applied a dab of J-B Weld on the outside – this time also including some notes and photos of the “temp fix”. Who knows what I remember when this “temp fix” fails or if I’ll still be operating myself? Leave the information for the next owner! lol]
BELOW: YET ANOTHER TEMP FIX! I didn’t want to place any epoxy inside the bowl so put a good dab of J-B Weld on the cleaned outside area. The hole underneath this “glob” was less than the diameter of a fine pencil lead – truly a “pin point hole”.

TAKE OUT THE JETS FOR CLEANING
Naturally once the carb was opened up that old “put off until tomorrow project” reared its ugly “JET HEAD”. There was no slot for a screw driver! Just a mangled brass head. Wasn’t until I found the box with old and new ATV parts and some notes that I recalled the Pilot Jet problem when the machine and I first met. Found a brand new pilot jet in the box also so the only problem was – how to get the old one out? I knew the basics regarding broken screw heads – drilling them out and using a reverse extractor, but that was in relation to regular sized construction screws – considerably larger than these small brass (soft metal) fuel/air metering jets. I was apprehensive as to whether I could successfully perform such work – because if I failed the carb would be nothing more than an interesting paper weight or source for cannibalized parts after buying a new one which is VERY EXPENSIVE. (If the drill bit cut through the side of the jet it would damage the carburetor threads and if drilled through the bottom would damage the seat – either way a messed up and lost carburetor.)
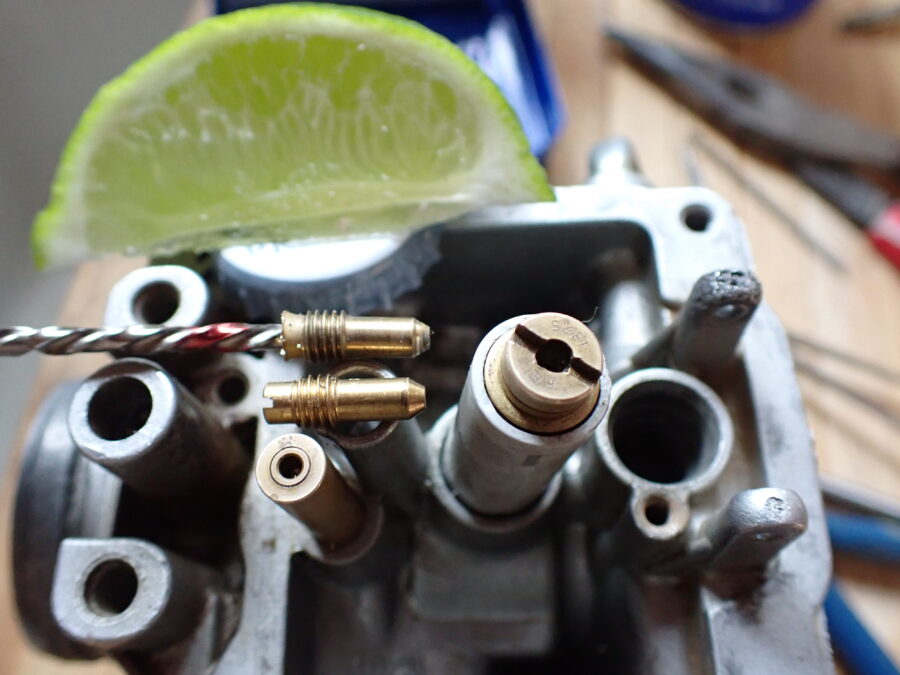
BELOW: December 27th 2021 Successfully drilled out broken PILOT JET with reverse drill bit! (Extractor could not get a good bite for removal) No! That’s not blood on the drill bit only red magic marker to assist in NOT RUINING THE CARB by drilling too deep! lol

BELOW: FINALLY! The extracted damaged jet compared with a new one.

OH, THE LIME? That was for the celebration of the personal accomplishment in removing my first stuck carb jet!
Yes, as a matter of fact, I do believe I have injured my shoulder with all the excessive self actuated “pats on the back”! lol
BELOW: New Pilot Jet installed (Large brass Jet is the Main (needle) and next to it on right is the Pilot Jet – recessed in the round carb housing tube. The far right recessed silver screw (outside carb when float bowl is reinstalled over the the Main and Pilot Jet) is the pilot air jet or idle jet adjustment screw.

I proceeded deeper into the carburetor this time (since the first extremely cautious cleaning) and discovered an “O ring” on the the float needle assembly seat had apparently dissolved through the years which is the apparent reason I had to shut off fuel from the tank for prolonged periods of non use to prevent flooding the float bowl and having fuel possibly enter the crankcase – VERY BAD! The assembly was also missing a hidden fuel screen that is often overlooked during cleaning. (Thank Heavens for these DIY videos on YouTube – but like everything else – research is everything. Learn as much as you possibly can and then choose an approach that makes the most sense.)
Now I wait for some other crucial parts to continue the journey on reviving the ATV. Even if the entire project fails for one reason or another (and I have to purchase a new carb) I am still quite pleased with overcoming my fear and tackling the broken jet problem.
BONUS! What is especially exciting about this recent project (and new knowledge accumulated – or in the alternative relearning stuff long forgotten) is that a choke problem I have had for years (with an otherwise well functioning engine) is very common … The choke had to be engaged for proper idling AFTER ENGINE START UP – whereas it (the choke) is traditionally only operated to furnish extra fuel during a cold start). I knew something was wrong but it always started and ran well so I dismissed the issue as something to deal with later. Well, now is later.
TO THE INTERNET ROBIN!……. ATVs, UTVs, motorcycles, other internal combustion vehicles…. there were many articles and videos on
“Why must my choke be on full for the engine to run properly?”
Anyone care to take a wild guess what the answer is to this common carburetor problem?
(music and ticking clock background…..)
YES! A CLOGGED PILOT JET IN THE CARBURETOR!
TOSS THAT VIEWER A MANGLED MEMENTO PILOT JET ! lol
(Ah oh…. Just remembered…. I have a generator doing the same thing with it’s choke! Maybe just a good cleaning will work on that one?)
My best to you and yours, Lew


